An important update is available for FreeStyle LibreLinkØ. Check here for more information.
05 Dec 2018

Well planned and executed assays can allow the detection and monitoring of multiple parameters simultaneously in complex samples. Such multicolour assays can produce an enormous amount of data from precious or limited samples. Data quality (results) depends greatly on careful panel design, reagent choice, reagent optimisation and instrument setup.
1. Define your hypothesis/have a clear idea of the question in mind
First and foremost, having a clear understanding of the biological question at hand is always the best place to start. More colours mean more complexity and the potential for complications. Therefore, each marker needs to be considered independently and not thrown in “just because”.
In an ideal scenario, one would have a good understanding of the antigens under investigation (e.g. low expression vs high expression and rare vs abundant expression). In addition, co-expression is also important, therefore gathering information about expected co-incidence of receptors on each cell type will also aid in effective panel design. Some suppliers may provide information (i.e. antigen density) on their websites otherwise a thorough literature search is a useful place to start.
Once information about your antigens is gathered, the next step is to order these, or categorise them based on their importance and if known, antigen density. This information will then be used to pair the antigens with appropriate fluorophores. Before choosing fluorophores, the capabilities of your instrument must first be realised so that a hierarchy of reagents can be determined.
2. Obtain instrument characteristics to determine what the instruments you have access to are capable of (how many colours)
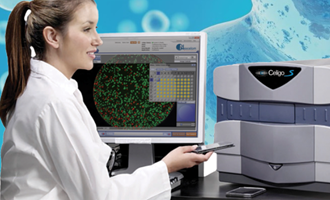
It is important to understand the capabilities of the flow cytometer you intend to use for multicolour analyses. Many newer cytometers have three or more lasers, such as blue (488 nm), yellow/green (561 nm), red (640 nm), violet (405 nm) and ultraviolet (355 nm). Laser power can also influence reagent choice. As well as laser configuration, the number of detectors per laser, and filters available determine the ultimate configuration which defines how many colours can be detected simultaneously.
3. Understand your reagent characteristics - know your fluorophores, i.e. relative brightness, spill-over compatibility, product availability
As more and more reagent choices are released to the market, it is important to understand the properties of these, (such as excitation and emission), so you can effectively design experiments based on the specifications of your available instruments. For example, which dyes are brightest, versus dimmest, and which dye combinations may be problematic (on your instrument). However, also bear in mind that no two instruments are identical, so determining the fluorophore hierarchy (brightest to dimmest) for your instrument is recommended. In addition, determining the spillover matrix for all possible fluorophores (i.e. the maximum on the instrument) will help flag channels that are badly affected by “neighbours” or cross-laser spillover and therefore combinations best to avoid. It is a good idea to get familiar with which dyes are tandems (and what the base dye is), and understand their limitations. Tandem dyes can disassociate and therefore care must be taken to avoid this - such as minimizing exposure to light and fixation. In addition, different lots can have different spectral properties, which will require different compensation values. Therefore, you can’t “sub” in a different antibody with the same tandem for compensation controls. Similarly, compensation controls must be done on every unique lot of tandem.
In any case, the wide range of available tandem dyes are what make multicolour panels possible. Fluorophore choice can be easy when only a few markers are required. However large panels, ie 17+ colours can be very challenging and can involve many iterations to get it right. This is because we can’t always predict biology, no matter how well we characterise our instruments and understand reagent properties.
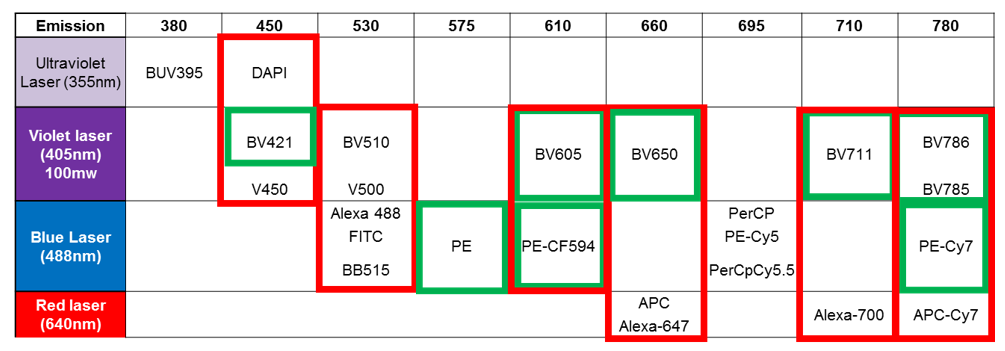
This table demonstrates the potential for spillover between fluorophores, either through cross-laser spillover (red) or residual spillover (green) between tandems and their base (PE and BV421 are base dyes). Image courtesy of Dr Anna Brooks.
4. Rank fluorophore pairing based on antigen density, fluorophore brightness, reagent availability and antigen co-expression
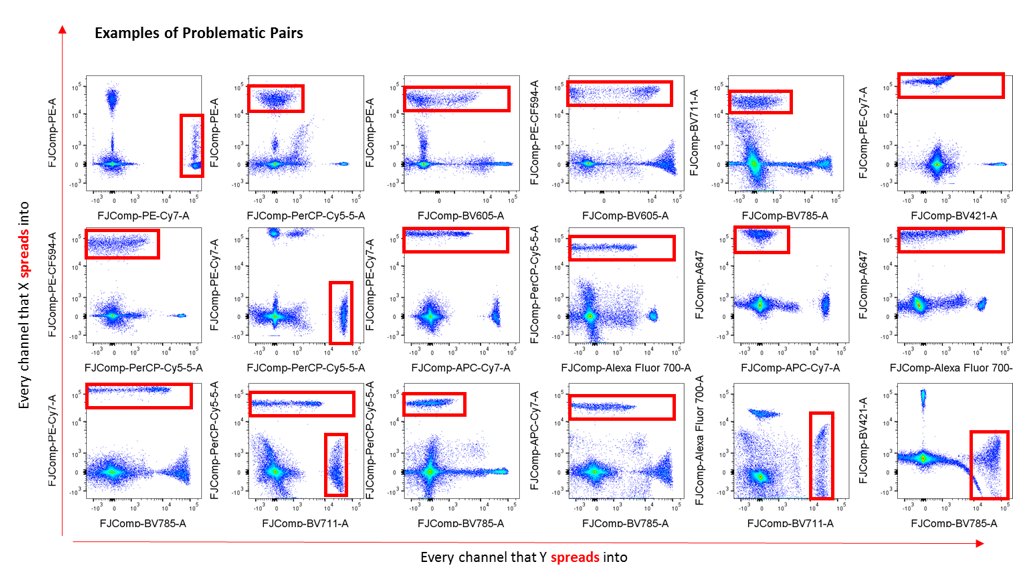 This figure demonstrates the problematic fluorophore pairs on a 4 laser, 17 colour FACS AriaI instrument. 17 single colour compensation controls were prepared, compensation performed, and then mixed all together to reveal spillover/spread. This exercise is very useful to determine fluorophore characteristics to assist in multicolour panel design. Image courtesy of Dr Anna Brooks.
5. Titrate all reagents and trial panel, including FMO controls of every colour
Multicolour panel design is often described as a set of rules to follow, similar to those outlined above. However, these are just guidelines after all and in some cases, execution won’t always be as straight forward as characterising and ranking antigens and pairing them with their ideal fluorophore. There will be many cases where we simply don’t have any prior knowledge of antigen density or co-expression. In addition, reagent availably may limit the panel design. More colours = more complex and working with many fluorophores will be challenging (eg 17+).
Finally, working with dissociated tissues can also be difficult. Digested tissues can be prone to cell losses (post thaw) and are complex/heterogeneous cell mixtures full of debris. It is important to use DNases to prevent excessive cell losses, strainers to remove large debris, and a viability marker or dead cell exclusion marker to exclude these from analyses. In addition, dissociated tissues are often a heterogeneous mix of cells and so care must be taken to characterise the different autofluorescence levels to avoid masking dim antigen expression on non-auto cells. Titrating antibodies can also be difficult due to low cell frequencies, cellular autofluorescence and dim markers.
Dr Anna Brooks holds a BCA (management) and a PhD in Immunology and is a Senior Research Fellow with the Maurice Wilkins Centre at the University of Auckland. Anna is also an expert flow cytometrist and is director of Auckland Cytometry, the flow cytometry core facility for the Faculty of Science. Anna’s primary interest lies in developing multicolour panels to characterise complex cellular populations in digested human tissues. Anna is also an active member of the international flow cytometry community and currently sits on the Australasian Cytometry Society Council as research liaison. When not marvelling in the many fluorescent colours of the cytometry world, Anna enjoys to scuba dive and explore the vibrant wonders of our underwater world.

Dr Anna Brooks
University Of Auckland, School Of Biological Sciences
05 Dec 2018
If you enjoyed reading our articles, why not sign up to our blog mailing list? You'll get new articles straight to your inbox as they're released!