Enjoy FREE SHIPPING on all FreeStyle Libre 2 purchases until 31 May 2024. Simply enter promo code FREESHIP at checkout and click ‘SUBMIT CODE’ to apply!
Pharmac proposes to commence FreeStyle Libre 2 subsidy for people living with type 1 diabetes! Read more
22 Nov 2018

Compensation is one of those topics in flow cytometry that is critical to get right, yet is poorly understood, and often feared. Compensation is the process which “corrects” the detected signal from the fluorophore destined for the primary detector by “subtracting out” any signals that “spilled over” from the other detectors. The primary purpose is to allow the measurement of the true fluorescence in the primary channel contaminated by the spillover from neighbouring fluorophores.
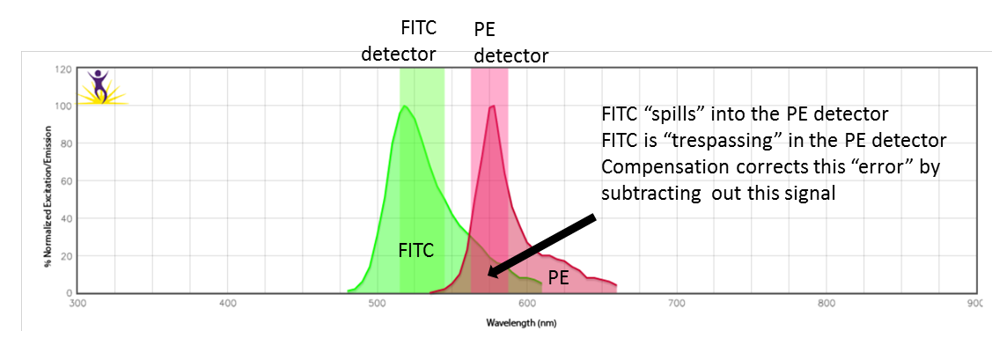
Image courtesy of BioLegend
Therefore, compensation corrects for fluorescence “trespass” between fluorophores. However, it is not perfect and cannot fix all of the undesirable effects. Reagent choice is thus also an important consideration when designing experiments. Even with proper compensation, if an overly bright signal spills over into a neighbouring detector where a dim signal is to be detected, resolution sensitivity will likely be affected and the populations may not be resolved accurately. It is important that all populations are resolved as best as possible. In addition, the calculations are only as good as the quality, or accuracy of the compensation controls themselves.

This figure shows how comp beads (single colour compensation tubes mixed together) can be used to demonstrate the effects of compensation. The first and second panels show compensation before and after between fluorophore pairs with manageable spillover. The third panel demonstrates that despite correct compensation, PE (when very bright) spreads into BV605. This provides useful information when designing panels as a bright PE signal will affect a dim BV695 signal.
In order to get good quality data, compensation controls must be done correctly. Compensation is often performed at the instrument using an auto-compensation wizard. Alternatively, compensation control data can be collected and analysed off-line using third-party post-acquisition analysis software.
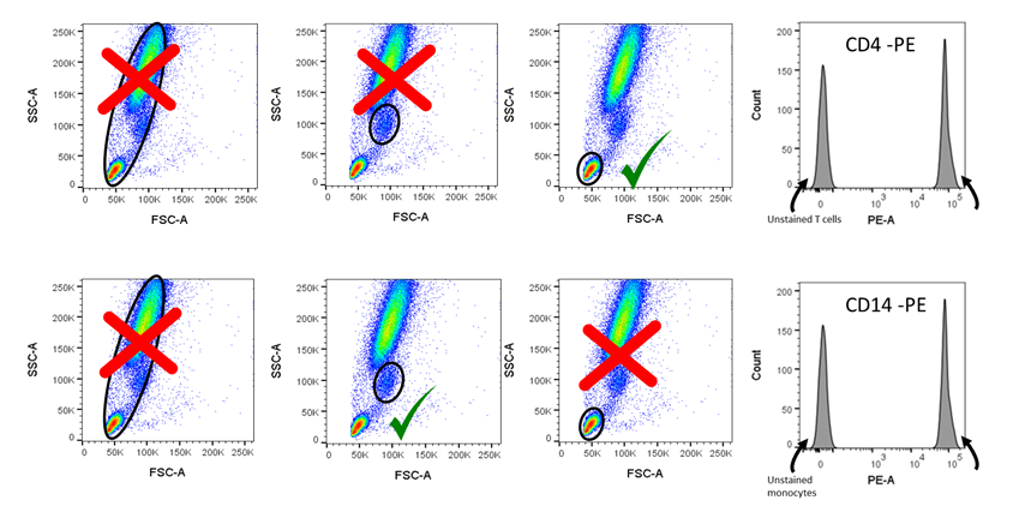
This figure demonstrates that gating is very important when setting up single colour compensation controls with stained cells. For CD4 T cells, the lymphocyte gate will be sufficient to gate negative lymphocytes (ie CD8 T cells) and positive CD4+ T cells. However, for CD14+ monocytes, all cells within the correct gate will stain positive, therefore unstained cells must be added to the control to achieve both negative and positive signals. Image courtesy of Dr Anna Brooks.
3. Matched Fluorophores: Finally, reagents used to set up compensation controls, in most cases, must be the same as the experimental reagent. This is a must when using . This is because tandem dyes can have lot-to-lot variation. For non-tandem dyes, matching the exact same reagent isn’t as crucial. Dyes such as PE, FITC, APC, and Alexa®, or Alexa Fluor® dyes don’t have the issues inherent with the tandem dyes, so in some cases,these reagents don’t have to exactly match. For example, you might want to swap out CD25-PE (an activation marker) with CD8-PE if you are using cells for compensation and you aren’t sure whether CD25 will be present or bright enough on your control cells. In any case, always aim to use the exact same reagents from your experiment for your single colour controls.
Another factor that often confuses newbies to flow cytometry, is what control particles to use for compensation controls, i.e. cells, beads or both. The short answer is, it depends…
If you sample is plentiful (i.e. PBMC), and if the markers you are detecting are plentiful, then using a full suite of single stained cells is likely to give the most accurate compensation. It is not always perfect, but this is likely the best-case scenario. Using beads, however, is also perfectly acceptable.
Antibody capture beads, or compensation beads, are homogenous polystyrene particles coated in antibodies that can bind antibodies via the Fc region. They are available from various vendors against mouse, rat and hamster Igs and can come in different sizes (i.e. different binding capacity). Some are against the kappa chain, which means they bind most but not all antibodies, while some are cross species. So do take care to note the isotype your beads are capable of binding, and what species your antibodies are raised in. In addition, as these beads are designed to capture antibodies, they will not bind your live/dead viability dyes and so care must be taken to add in an appropriate control. If using amine reactive dyes (i.e. Zombie viability dyes) you can buy the ArC™ Amine Reactive Compensation Bead Kit to add this into your compensation matrix, or otherwise prepare dead cells if required.
There are many reasons why researchers now choose to use compensation beads for all their experiments. These include:
1. Reproducibility. Using beads, you will always know that you’ll get a bright signal. You can work out what dose to stain your beads (i.e. some beads can be too bright when saturated) and use this for all future experiments.
2. Low frequency: If the frequency of the positive signal (i.e. rare cells) will not be adequate to get sufficient events for statistical significance (i.e. compensation wizard suggests 5000 events).
3. Too dim: If the marker of choice is dim, or poorly resolved. In addition, if the marker of interest is modulateable (i.e. expressed upon activation) it will be more reliable to use beads.
4. Tandem dyes: If a dim marker can’t be swapped out for an abundant one when coupled to a tandem. (i.e. a CD8 instead of CD25).
5. Sample availability: tissue, clinical or animal samples are often precious, or not in plentiful supply to consider “wasting” on compensation controls. In most cases beads will always be the control of choice in this situation.
On the other hand, there can be valid reasons, although uncommon, where cells must be used instead of beads. This scenario is indeed rare, and so far has not been encountered for immune cell markers (at least in humans). In the stromal field, there are some cells with highly abundant antigens. So much so that when using correct doses of antibody (after titrating) they are still brighter than a fully saturated compensation bead. Even when using the biggest compensation bead on the market (i.e. CompBeads Plus (7.5µm)), the cells are just too bright. In this case, we just use a combination of beads and cells, making sure that in each case the correct unstained control is used. I.e. unstained beads + stained beads, and unstained cells + stained cells, again, making sure that the correct cells with matching autofluorescence are gated on. To ensure the correct negative is used for each compensation control, it is best to avoid using “universal negative” and instead make sure each control tube has both positive and negative populations, whether beads or cells are used.
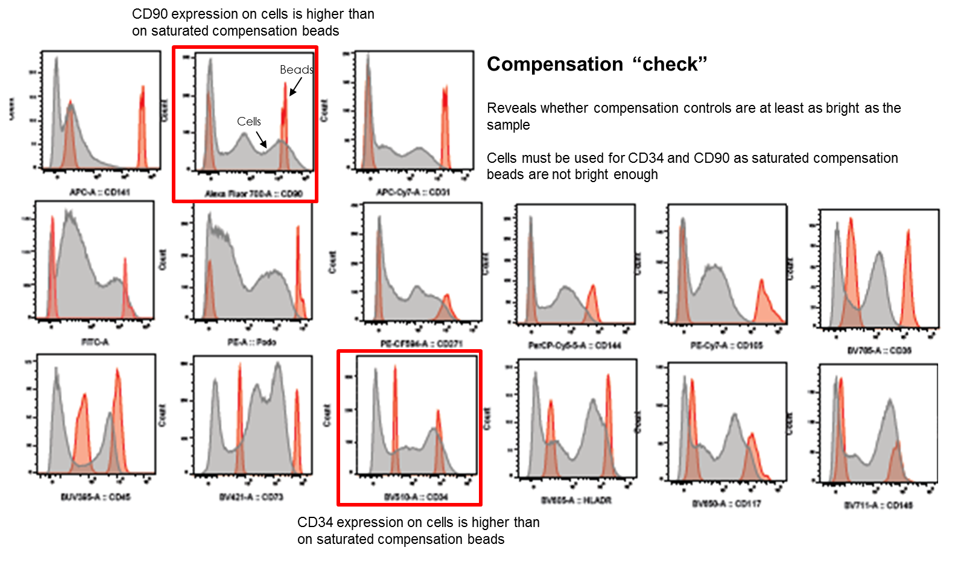
To determine if all compensation controls (beads) are brighter than the real signal on cells, controls are overlaid with the fully stained sample. In this example, A700-CD90 and BUV395-CD34 staining is too dim on beads (saturated) and therefore stained cells will be required to achieve correct compensation for these fluorophores. Image courtesy of Dr Anna Brooks.
Many core labs (or experienced operators) will have optimised your instrument or provided optimised settings to use for your experiments. Therefore, if you find that your single stained compensation beads are off scale, do NOT alter the voltage, i.e. reduce the voltage to reflect this bright staining. This is just a bead, a non-biological element of your experiment that you require to correctly compensate your data. You should not adjust settings according to a bead. Instead you should drop the dose of the antibody. This may seem like an unusual phenomenon, however the larger Comp beads Plus (BD Biosciences) can indeed be too bright when saturated (at least on instruments with high power lasers). So just remember that you shouldn’t adjust setting to suit a non-biological particle, such as a compensation bead. This is however perfectly acceptable, and indeed necessary if your single colour controls are stained cells and are not on-scale. In this case you will need to reduce voltage to allow your sample to be on-scale, as this signal is biologically relevant, unlike a compensation bead.
Dr Anna Brooks holds a BCA (management) and a PhD in Immunology and is a Senior Research Fellow with the Maurice Wilkins Centre at the University of Auckland. Anna is also an expert flow cytometrist and is director of Auckland Cytometry, the flow cytometry core facility for the Faculty of Science. Anna’s primary interest lies in developing multicolour panels to characterise complex cellular populations in digested human tissues. Anna is also an active member of the international flow cytometry community and currently sits on the Australasian Cytometry Society Council as research liaison. When not marvelling in the many fluorescent colours of the cytometry world, Anna enjoys to scuba dive and explore the vibrant wonders of our underwater world.

Dr Anna Brooks
University Of Auckland, School Of Biological Sciences
22 Nov 2018
If you enjoyed reading our articles, why not sign up to our blog mailing list? You'll get new articles straight to your inbox as they're released!